PC Doctor Godalming

Dedicated to Fixing Computers of all Shapes and Sizes
01483 424378
07876 476990

Category: Windows 10

Windows 10

Pictures not showing in Windows 10 | 11File Explorer

Ensure Thumbnails Are Enabled

  1. Open File Explorer.
  2. Click on three horizontal dots at the right end of the ribbon tabs and then choose Options from the menu.
  3. In the Folder Options window, uncheck the box beside Always show icons, never thumbnails (if it’s checked).
  4. Click Apply and hit OK

Enter Safe Mode using Windows 10 Install USB and Command Prompt

  1. Boot USB and set  language
  2. Select Repair your computer
  3. Select Troubleshoot > Command Prompt
  4. Use Bcdedit to set Safe Mode on boot as follows
  5. bcdedit /set {default} safeboot minimal
  6. Close Command prompt
  7. Select Turn off PC
  8. Power up PC to enter Safe Mode

To stop PC entering Safe Mode on every boot run System Configuration tool (msconfig) and under Boot options untick Safe boot, click OK and close

Continue Reading

Windows 11 Registry Hack for Unsupported CPU and TPM

This patch will allow the Windows 11 to install and run on machines without the required CPU,e.g. Intel 7th generation and lower and with TPM chips less than version 2.0

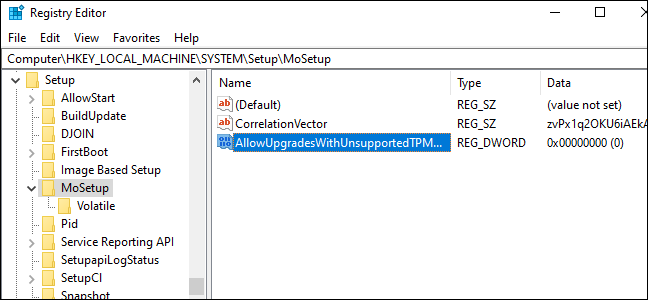
Type the following address into the address bar in the Registry Editor window (or navigate to it in the left pane):

HKEY_LOCAL_MACHINE\SYSTEM\Setup\MoSetup

Right-click in the right pane, select New > DWORD (32-bit) Value, and enter the following text as the name:

AllowUpgradesWithUnsupportedTPMOrCPU

Double-click the “AllowUpgradesWithUnsupportedTPMOrCPU” value here,

Continue Reading

Enable USB Quick Removal

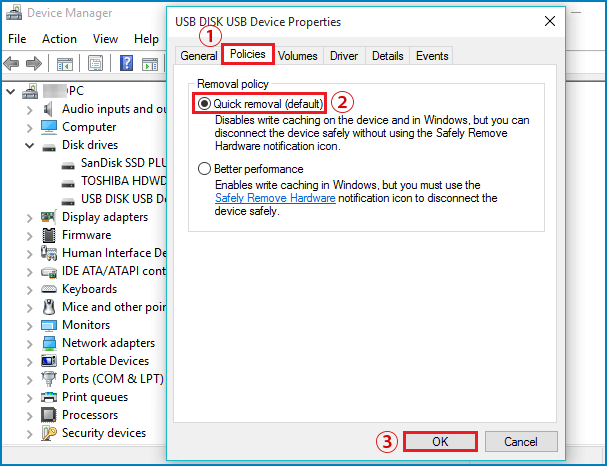
In order to safely remove USB in Windows you can enable the Quick Removal feature in Device Manager

  1. For example in Windows 10 right-click the Start button (Windows Logo) and select Device Manager.
  2. Double-click Disk drives to expand it to see list of disk drives including your currently usb drive
  3. Right-click the usb drive and select Properties
  4. Click Policies tab and select “Quick removal (default)” radio button to enable it and click OK to save changes

This disables write caching to allow it to be remove without having to use “Safely Remove Hardware”

Continue Reading

Windows 10 Quick Assist

Run Windows 10 ‘Quick Assist’ to remotely assist someone with their PC.

‘Quick Assist’ , available from version 20H2 onwards, requires a Microsoft account.

  1. Right-click the Start button
  2. Click Search
  3. Type Quick Assist and hit Enter on your keyboard
  4. Ask remote user to do the same
  5. On your PC, click Assist another person
  6. Select your Microsoft account and login
  7. Give the six-digit code (see screenshot above) to the remote user to enter into the ‘Code from assistant’ box
  8. Remote user then clicks Share screen
  9. Assistant then chooses either Take full control of their PC or View only their desktop
  10. Remote user then clicks  Allow

Once connected,

Continue Reading

Fix Windows 10 Update Failures, e.g. Error 0x800f081f

Try running DISM and SFC commands to repair Windows system files. Once complete reboot and try running the update again.

DISM /Online /Cleanup-image /RestoreHealth

The above DISM command typically completes without issues, but if there are problems replacing the damaged files, you will need to provide another image using the Source option to complete the task. You can use an “install.wim” or “install.esd” file from another computer, bootable install media, or Windows 10 iso file. Make sure that the files match the version,

Continue Reading

Enable Windows F8 Safe Mode Boot Key

Follow steps below to enable F8 safe mode boot (applies to Windows 10 and 8.1):

  1. Boot PC using Windows 10 or  8.1 ISO USB flash drive or DVD
  2. Click Next to skip the first screen
  3. Press Shift + F10 To open advanced Command prompt window

Type the following command to enable F8 Safe Mode boot key:

bcdedit /set {default} bootmenupolicy legacy

Type Exit and press Enter to quit the Command Prompt.

Continue Reading

Disable Cortana in Windows 10 AU 2016

For reasons only known to Microsoft since the AU update you can no longer disable it from the desktop. However you can make the following registry change to work round this.

Press Windows+R and run “regedit” and navigate to the following key:

HKEY_LOCAL_MACHINE\SOFTWARE\Policies\Microsoft\Windows\Windows Search

If you don’t see a “Windows Search” below the Windows folder, right-click the Windows folder and select New > Key and name it “Windows Search”. Right-click the “Windows Search” key (folder) and select New >

Continue Reading

Windows 10 Not Updating

If Windows 10 is not updating automatically then it is most likely due to system file(s) corruption.

To remedy this run SFC from the Adminstrator Command Prompt window as shown below. Once complete reboot and run Check for Updates within Settings, Update & security.

sfc /scannow

If this fails run DISM (Deployment Image Servicing and Management)

dism.exe /online /cleanup-image /restorehealth

When finished restart PC and Check for Updates again

Continue Reading